
Configuring a SIP Trunk VoIP Provider 3cx setup
Introduction
To make outbound calls on the PSTN you need to configure at least one SIP Trunk / VoIP Provider or VoIP gateway.
Voplid SIP Trunk providers “host (control.voiplid.com)” phone lines and replace the traditional telecom lines. VoIP Providers can assign local numbers in one or more cities or countries, route these to your phone system. Even though SIP Trunks are usually cheaper than traditional PSTN lines.
-
Requirements for Using a Voiplid SIP Trunk Account
- A firewall / router / NAT device that supports static port mappings and disabling SIP ALG. Devices performing port address translation, cause problems such as one way audio, failing inbound calls, etc. A static external IP is required, as inbound calls fail if your external IP changes intermittently. See the Firewall & router configuration guide for more info.
- Adequate Bandwidth. The real-time nature of VoIP places a demand on your internet connection, consuming approximately 30-120 kbps depending on the codec used. See Bandwidth overhead over DSL connections for more info on bandwidth consumption and codec bandwidth efficiency.
-
Conduct the Firewall Check
3CX includes a Firewall Check to verify that your firewall, sitting between 3CX Phone System and the VoIP Provider, is correctly configured to route VoIP traffic. To check the firewall configuration from the 3CX Management Console:
- Go to “Dashboard” > “Firewall” and click “Run”.
- Verify that the tests for the SIP port (default 5060), and the Audio port range (default 9000-9255) succeed, otherwise you need to check and troubleshoot your firewall.
Note: 3CX does not provide specific firewall configuration support. See the configuration guides for popular firewalls.
-
Add a VoIP Provider Account in 3CX
After Creating a Voiplid sip trunk username and password , you need to configure the account in 3CX:
- From the 3CX Management Console, select “SIP Trunks” > “Add SIP Trunk”.
- Locate and select your VoIP provider from the drop-down list, otherwise select the “Generic” option in the “Select Country” drop-down menu and then choose “Generic VoIP Provider” or “Generic SIP Trunk”. Generic providers or trunks are not guaranteed to work with 3CX.
- Enter the SIP trunk main number or one of the DID’s as the main number. Click “OK” to create and proceed to configure the SIP Trunk.
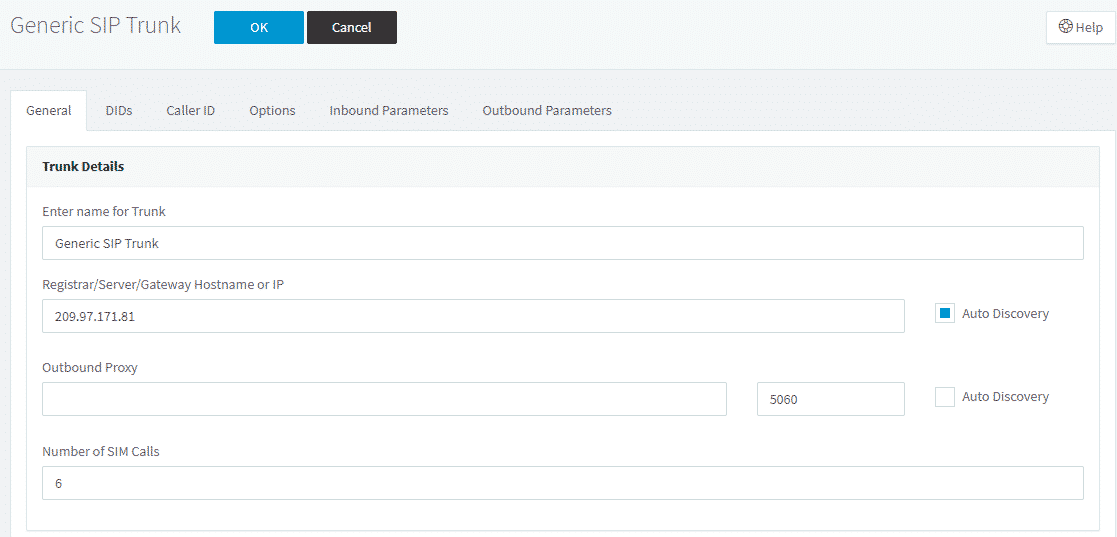
- Enter a name for this Voiplid account username. Crosscheck the pre-filled “Registrar/Server/Gateway Host-name or IP” and optional “Outbound Proxy” with your VoIP provider info. You can use the “Auto Discovery” option to automatically detect the appropriate ports to use. (Recommend choose Register gateway).
- Specify the “Number of Simultaneous Calls” .
- Choose “Authentication” type to the default select:
- “Register/Account based” – enter SIP authentication ID and password which you have create earlier on voiplid network customer portal.
- “IP based” – authentication is linked to your IP, ID and password may not be required.
- “Inbound only” and “Outbound only” – not applicable in most cases.
- Specify the routing for calls matching the main trunk number.
- Add DID’s – Click on the “DID’s” tab and use “Add Single DID” to add each DID number associated with this account. DID numbers created are linked to the operator extension. You can add an inbound rule for the DID in “Inbound Rules” and route to an alternate destination.
- In the “Caller ID” tab, add the caller ID to display on outbound calls.
- In the “Options” tab you can set:
- “Call options” – use to allow inbound and/or outbound calls and disable video calls.
- “Advanced”:
- “Transport Protocol” – if your SIP trunk provider supports TLS (Transport Layer Security), set to “TLS” and upload a security certificate (.pem) provided by your provider to secure communications on this trunk.
- “Alternative Proxy” – if supported by your VoIP provider, enable this option and set a secondary proxy host to simplify SIP trunk and DID management, i.e. avoid maintaining two SIP trunks for fail-over reasons.
- Click “OK” to save the trunk settings.
-
Create Outbound Rule to Route Calls Over the Trunk
Outbound rules dictate how 3CX routes outgoing calls, i.e. via different SIP trunks or gateways, based on which user or group is calling, the dialed number or the number length. You need to create at least one outbound rule to start calling with 3CX.
To create an outbound call rule in the Management Console and route calls via this trunk:
- Go to “Outbound Rules”, select “Add,” and enter a name for the new rule.
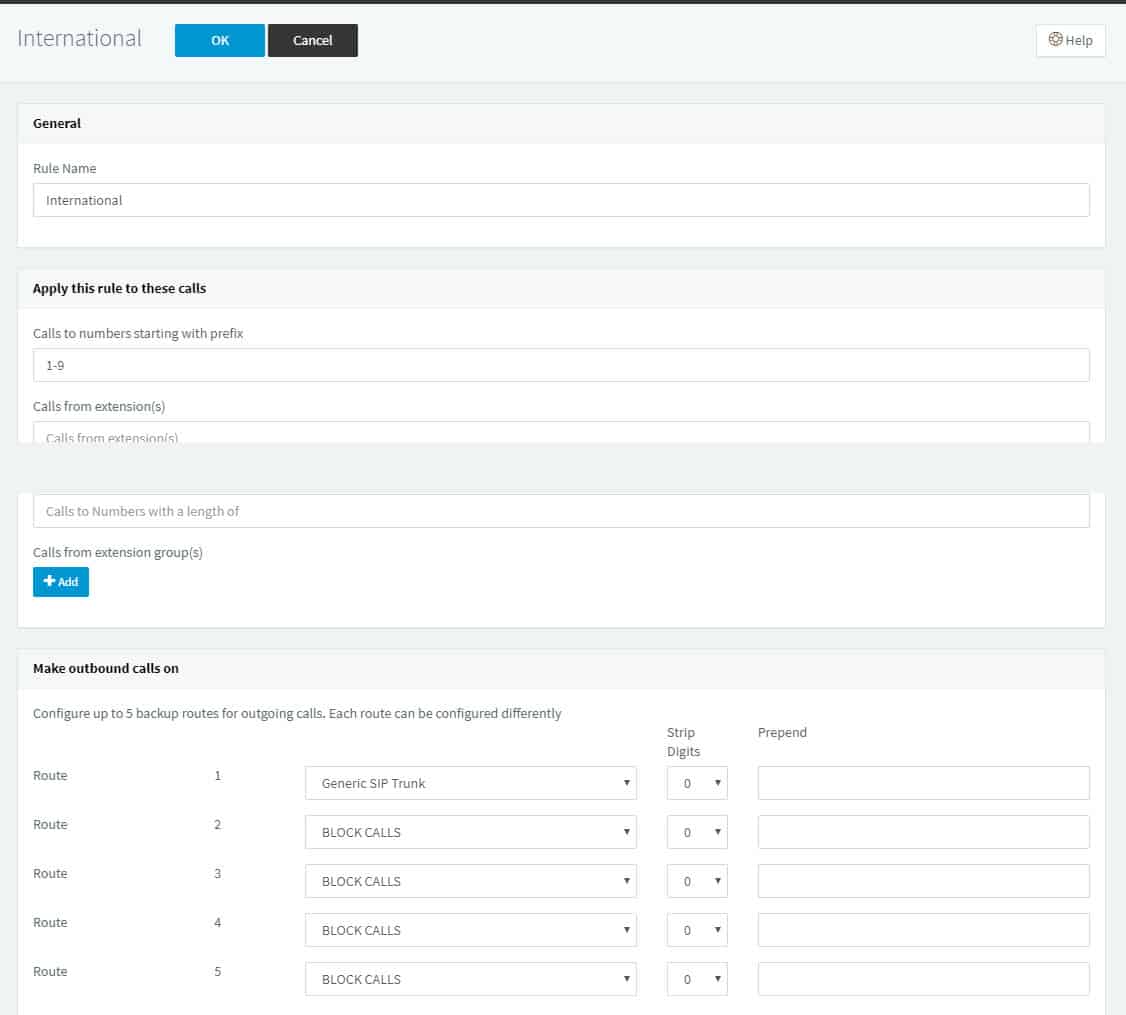
- Specify any matching criteria to trigger this outbound rule in the “Apply this rule to these calls” section:
- Calls to numbers starting with prefix – Apply this rule to all calls starting with the number you specify, e.g. entering the prefix “9” indicates that outbound calls to numbers starting with “9” trigger this rule.
- Calls from extension(s) – define the extension(s) or extension range calling to trigger this rule. Specify extensions separated by commas and ranges using “-”, e.g. 100,102-120.
- Calls to numbers with a length of – trigger this rule when calling numbers with the specified digit length, e.g. 8 digits, to differentiate calls between local and national numbers, without requiring a prefix.
- Calls from extension group – select the calling extension group(s) that trigger this rule.
- “Make outbound calls on” – select from the defined gateway(s) or provider(s) to set up to five alternate routes for the call. If the first route is not available or busy, 3CX automatically tries the next route, until the call can be made or the default “Block Calls” route is reached.
- To transform the number that matches the outbound rule, before the call is routed to the selected gateway or provider, use these for each route:
- Strip Digits – remove one or more digits from the called number, e.g. strip one digit to remove the prefix “9”, before the number is dialled.
- Prepend – add one or more digits at the beginning of the number, if this is required by the provider or gateway.
- Click “OK” to add the outbound rule.